Microsoft is taking a bit of the chore of designing workflows off of designers and letting business users define their own workflow layouts in Visio 2010 before exporting to SharePoint Designer to associate it with a List or Site. This allows business users to use a familiar graphical tool to define the steps in the workflow themselves instead of having to communicate their needs to designers or developers through a requirements document. The resulting Visio workflow can be used as the actual initial building block in the workflow.
Visio includes a brand new template aptly called Microsoft SharePoint Workflow that includes Condition and Activity shapes specific to SharePoint workflows.
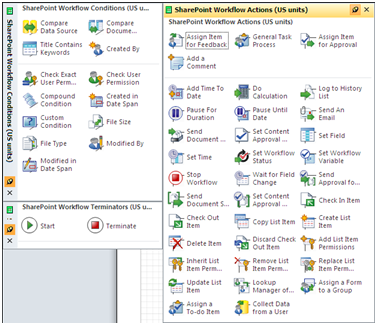
Visio Conditions, Activities and Terminators
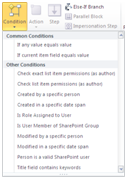
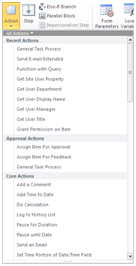
Not all of the Conditions and Activities currently match up to those available in SharePoint Designer.
This information is currently based on Technical Previews of both Visio 2010 and SharePoint Designer 2010 and both are subject to change in the Beta version due out later this year. It is also important to note that Designer connects directly to the SharePoint site and retrieves a list of available conditions and activities currently installed on the site including any created in Visual Studio and any 3rd party installed solutions, whereas Visio does not; the list available in Visio is static in this preview version. The ability to connect to the target site in Visio would be a great addition and would help to allow business users to build a more complete workflow ready for installation into a SharePoint site.
Creating a workflow will come naturally to users familiar with creating charts in Visio using drag and drop from the Shapes tabs and connecting them on the workspace, with the only difference being the SharePoint specific shapes. Below is an example of a simple workflow created in Visio 2010.
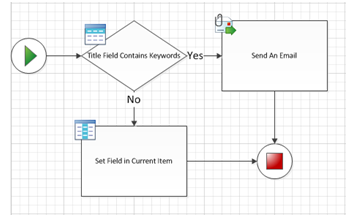
Visio currently does not include any Shape Data on any of the shapes, meaning that although you can drop a “Send an Email” activity onto the workspace, you cannot specify any of the properties on the activity such as the To address, Subject or email Body. A designer will need to import the workflow into SharePoint Designer for final configuration and publishing to a list or site. I will show shortly how Visio stores attributes for the shapes when exporting the workflow. The addition of the shape data would be the final piece that would allow business users to build a complete workflow ready for publishing and I am hopeful that this will be included in the beta and/or final release of Vision 2010.
After completing the workflow, it is necessary to check it for errors in logic. Visio 2010 includes the “Check Diagram” option from the Process tab of the Ribbon.
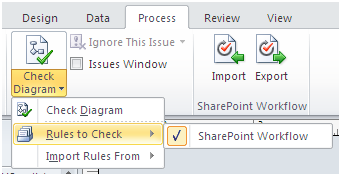
By default, the Check Diagram feature includes the “SharePoint Workflow” option as the rule base to check the workflow against. Clicking on “Check Diagram” will result in Visio checking the logic against SharePoint’s rules and will either notify that no errors where found or give a list of errors in the Issues Window below the workspace. Clicking on an issue will highlight the offending object making it easier to determine the cause and fix the problem.

Example of an error in the Issues window.
After successfully checking the workflow, you now must export it to the file system so that it can be imported into SharePoint Designer. On the Process tab of the Ribbon are the Import and Export buttons. Import allows you to open workflows created in SharePoint Designer for graphic representation and documentation. Since it is possible to create a workflow in Designer that uses activities built in Visual Studio that Visio does not know about, those activities show up as a generic Activity with the name “Custom Action”.
Exporting is as easy as clicking the Export button and choosing a filename and location. Visio 2010 will save the workflow with a .vwi extension. By simply renaming this file with a .zip extension you can open it and reveal the following 4 embedded files.
[Content_Types].xml
This file simply stores a list of the extensions of the files embedded in the .vwi file.
workflow.vdx
This is the Visio definition file for the workflow including file properties and layout details for the workspace. When building a workflow in Designer, you will notice each condition or activity includes a sentence where you set properties for its parameters. This file contains the text for those sentences for use when importing the workflow into Designer.
workflow.xoml
Designers and developers familiar with creating workflows in SharePoint Designer will be familiar with this file. It is an XML representation of the workflow including all conditions and activities and their parameters. Although Visio does not include shape data on the workspace, when exporting the workflow, the appropriate parameters will be included in this file. When importing the workflow into Designer, it uses this file to get the logic for the workflow as well as all of the parameters and values for each condition and activity. The exported file will have the value {x:Null} set for each parameter since there is no way to set these in Visio.
Here is a sample .xoml file as created when exporting the workflow shown above. The SequenceActivity section has been highlighted to show how the workflow logic including the conditions and activites is written to this file.
<ns0:RootWorkflowActivityWithData x:Class=”Microsoft.SharePoint.Workflow.ROOT” x:Name=”ROOT” xmlns=”http://schemas.microsoft.com/winfx/2006/xaml/workflow” xmlns:ns1=”clr-namespace:Microsoft.SharePoint.WorkflowActions.WithKey;Assembly=Microsoft.SharePoint.WorkflowActions, Version=14.0.0.0, Culture=neutral, PublicKeyToken=null” xmlns:x=”http://schemas.microsoft.com/winfx/2006/xaml” xmlns:ns0=”clr-namespace:Microsoft.SharePoint.WorkflowActions;Assembly=Microsoft.SharePoint.WorkflowActions, Version=14.0.0.0, Culture=neutral, PublicKeyToken=null”>
<ns0:RootWorkflowActivityWithData.WorkflowFields>
<ns0:WorkflowDataField Name=”__list” Type=”System.String” />
<ns0:WorkflowDataField Name=”__item” Type=”Microsoft.SharePoint.Workflow.SPItemKey” />
<ns0:WorkflowDataField Name=”__context” Type=”Microsoft.SharePoint.WorkflowActions.WorkflowContext” />
<ns0:WorkflowDataField Name=”__initParams” Type=”Microsoft.SharePoint.Workflow.SPWorkflowActivationProperties” />
<ns0:WorkflowDataField Name=”__workflowId” Type=”System.Guid” />
<ns0:WorkflowDataField Name=”calc” Type=”System.Double” />
</ns0:RootWorkflowActivityWithData.WorkflowFields>
<ns0:OnWorkflowActivated x:Name=”ID1″ WorkflowProperties=”{ActivityBind ROOT,Path=__initParams}”>
<ns0:OnWorkflowActivated.CorrelationToken>
<wf0:CorrelationToken OwnerActivityName=”ROOT” Name=”refObject” xmlns:wf0=”http://schemas.microsoft.com/winfx/2006/xaml/workflow” />
</ns0:OnWorkflowActivated.CorrelationToken>
</ns0:OnWorkflowActivated>
<ns0:ApplyActivation x:Name=”ID2″ __Context=”{ActivityBind ROOT,Path=__context}” __WorkflowProperties=”{ActivityBind ROOT,Path=__initParams}” />
<SequenceActivity x:Name=”ID3″>
<IfElseActivity x:Name=”ID4″>
<IfElseBranchActivity x:Name=”ID5″ Description=”ShapeGuid={5C21D244-2AB1-4447-A2BA-CE6431839784};PageId=0;ShapeId=4;”>
<IfElseBranchActivity.Condition>
<RuleConditionReference ConditionName=”__Rule_ID5″ />
</IfElseBranchActivity.Condition>
<ns0:EmailActivity x:Name=”ID6″ __Context=”{ActivityBind ROOT,Path=__context}” To=”{x:Null}” Subject=”{x:Null}” Description=”ShapeGuid={268E5AD8-F73D-4519-A56D-62246EAA3B33};PageId=0;ShapeId=8;” BCC=”{x:Null}” CC=”{x:Null}” Body=”{x:Null}” />
</IfElseBranchActivity>
<IfElseBranchActivity x:Name=”ID7″>
<ns1:SetFieldActivity x:Name=”ID8″ __Context=”{ActivityBind ROOT,Path=__context}” Description=”ShapeGuid={560EFD0C-3C56-41B6-BA1C-723C4ADE3FDD};PageId=0;ShapeId=12;” FieldName=”{x:Null}” __ListItem=”{ActivityBind ROOT,Path=__item}” __ListId=”{ActivityBind ROOT,Path=__list}” />
</IfElseBranchActivity>
</IfElseActivity>
</SequenceActivity>
</ns0:RootWorkflowActivityWithData>
workflow.xoml.rules
This file defines the rules used when checking the workflow for errors.
SharePoint Designer leaves behind the old look and feel of Front Pages; in 2010, it fits right in with the Office suite. In this technical preview, there are a few pieces that are not as obvious to access and even completely hidden and this is bound to get under the skin of technical designers and developers. However, my thoughts are that most of them may likely make their way into the public release due out by the time of this writing. I will only discuss those features associated with workflows in this article.
To see the list of workflows for the loaded site, simply click Workflows on the left Navigation bar.
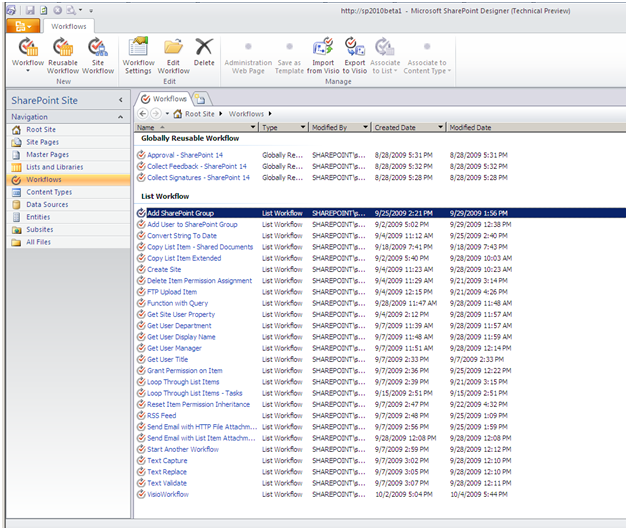
Importing a workflow from Visio 2010 is as easy as going to Workflows on the left Navigation bar and then clicking the “Import from Visio” link in the new Ribbon at the top of the window. You are prompted to locate the .vwi file created by Visio 2010 and to name and associate the new workflow with a list on the site, or to make it a Reusable workflow.
After importing the previous workflow shown in Visio, you come to the Edit screen for the workflow where you can define the values for the parameters as well as add additional conditions and activities.
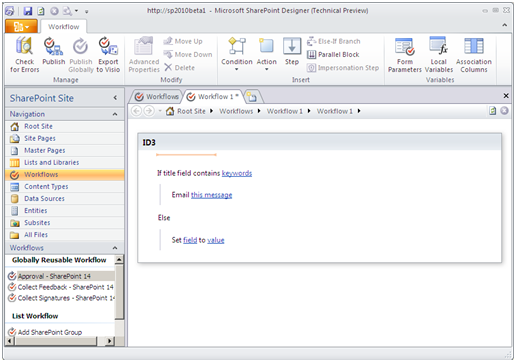
The Ribbon is context specific and now contains buttons for building and publishing the workflow. The Manage section includes buttons for Checking for Errors, Publishing the workflow and exporting as a .vwi file to Visio.
The Modify section includes buttons for moving activities around in the workflow as well as an “Advanced Properties” button where you can set the parameters for the selected condition or activity. This allows you to set values for the parameters directly as opposed to using the standard DesignerType. Clicking on the parameter in the sentence allows you to set the values using the Designer Type pop up window.
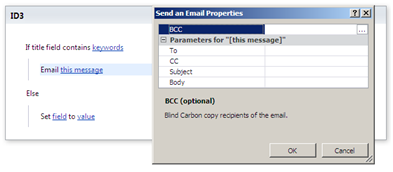
Example of using the Advanced Properties button from the Ribbon to set parameter values
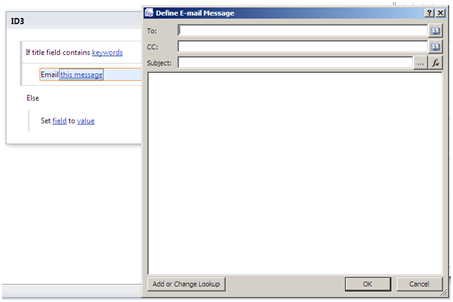
Example of using the DesignerType pop up window to set parameter values
The Insert section includes buttons for editing the logic of the workflow; inserting steps, conditions and actions, running sections in parallel and adding steps that use Impersonation to run as the workflow author.
Lastly, the Variables section includes a Forms Parameters button to define parameters used to gather data from the user on the Initiation and Association forms when the workflow runs. It includes the Local Variables button for creating variables for use within the workflow and that can be accessed as lookups on the workflow. The Variables section also includes an Association Columns button which allow you to automatically create columns on a list when the workflow is associated with it. The purpose of this is to make sure that these columns exist if the workflow depends on them for setting or gathering data.
The next logical step is to configure the parameter values in the workflow. As stated before, Visio 2010 does not include shape data for the shapes, however it does include all of the proper parameters in the .xoml file when exporting the workflow so the show up properly when importing into Designer. This is done by either using the Advanced Properties button or clicking on each parameter and using the pop up windows as described earlier.
Clicking on the Publish button validates the workflow for errors, saves the .xoml file and makes the association with the list in the content database. One of the options missing that developers in particular may miss, is the fact that there is currently no way to view the .xoml in Designer as there was in 2007. You will have to Export to Visio to produce the .vwi file to get access to the xoml code. If you make any changes to it, you will need to import the .vwi back into Designer.
When Publishing the workflow I have come across some errors in validation associated with the DesignerTypes in 2010. There has been some changes made in the DesignerTypes that will be the topic of another article. Workflows built in Visio 2010 should not be affected, but any existing conditions or activities built in Visual Studio will.
The next logical step that does not show up in the Technical Preview of Visio 2010 is the ability to create custom conditions and activities in Visual Studio and import them into Visio as well as the addition of shape data for the shapes in Visio 2010. With this new template addition, business users should enjoy the ability to create their own workflows knowing that what they build will actually become the core of the workflow they will end up using on the SharePoint site.