The problem: Having to install SharePoint on a server OS has been a consistent cause of complaint for years within the SharePoint community, especially for developers. The proliferation of virtualization technologies (such as the free Virtual PC and VMWare Server for client OS’s, and Virtual Server and Hyper-V for server OS’s) have helped to soothe the pain – but didn’t make it all better for many. The picture has gotten more complicated with SharePoint 2010. Now 64-bit hardware and operating systems are required, which significantly narrows the options for desktop lab environments. Hyper-V is the only Microsoft virtualization technology capable of running 64-bit guest machines, but it only runs on a Windows 2008 Server host machine. Even if your laptop or desktop is 64-bit, most of us probably aren’t running a server OS on it. I did try using Windows 2008 Server as my laptop OS for a couple of months, but the performance load of Hyper-V and the SharePoint guest resource requirements caused a significantly slower environment than I was prepared to accept for my everyday use. I know there are possibilities for running 64-bit guest machines on a client host OS via VMWare, but I wanted to see if it was practical to use Microsoft software because of my familiarity level with it.
Two solutions: However, there are some new developments in SharePoint 2010 and Windows 7 that open some new doors to the desktop / laptop dev environment. TechNet now documents that 1) SharePoint 2010 offers an option for installing on a client OS – at least for development use, and 2) that a pre-installed and configured vhd can be mounted as a secondary bootable drive on a Windows 7 PC.
In this post, I will document my experience installing SharePoint 2010 directly on my Windows 7, x64, 4gb RAM laptop while I’m home fighting the flu this week. In another post, I will look at mounting a pre-installed Win2k8 server vhd as a bootable drive.
Installing SharePoint 2010 on a client OS – The nitty gritty
This is the simplest solution for creating a desktop lab environment for SharePoint 2010. There is no longer a need for a virtualization product, which means fewer resources are needed with no guest OS to provide for. Bamboo Solutions created a helpful utility for installing WSS 3.0 and MOSS2007 on Windows XP / Vista – so this is not a new idea. However, this tool doesn’t work on SharePoint 2010. Fortunately, there is a native (although not obvious) way to accomplish this in the 2010 product line that is documented in the first link above. It basically boils down to editing a config file and manually installing the pre-reqs. Here’s the procedure I followed.
**** UPDATED: This is now confirmed to work for both MSS 2010 and SharePoint Foundation (the replacement for WSS) in the public beta released to MSDN on 11/16/2009. However, step 4 below is now a necessary addition to the process.****
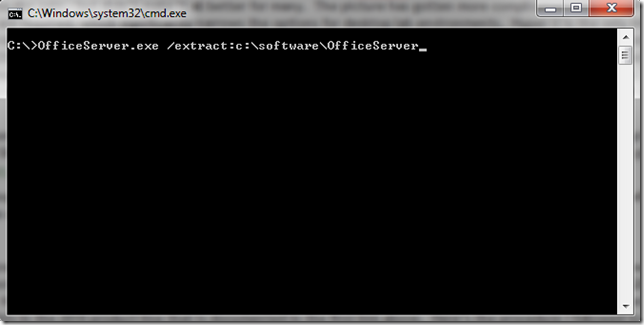
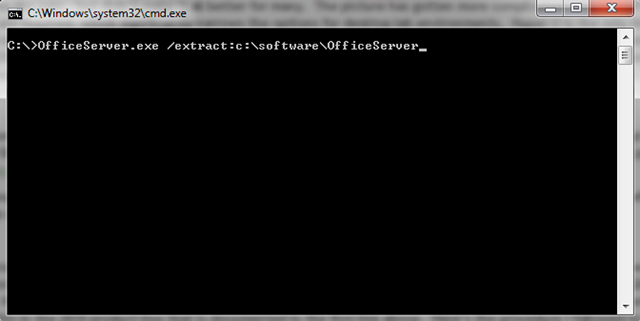
- Extract all files from the SharePoint.exe installer file from which you intend to install SharePoint (for any other SharePoint 2010, the replacement for WSS, the filename will likely be OfficeServer.exe instead of SharePoint.exe). This is done with the /extract:directoryname switch, as shown below. This may prompt you with one of the wonderful UAC ‘are you sure’ boxes. If so, just click Yes and move on.
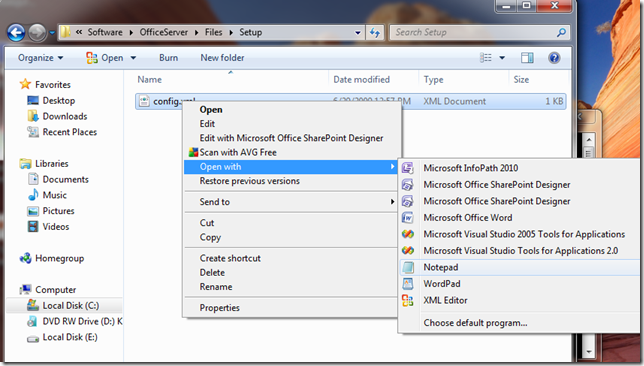
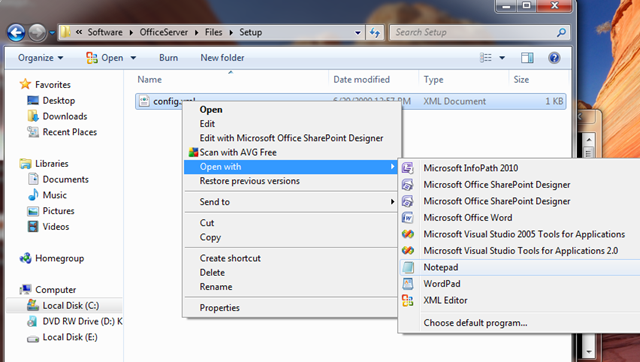
- The result will be a folder with the entire set of installation files for SharePoint 2010. Go to ExtractedDirectoryNameFilesSetup, and open the Config.xml file using Notepad.
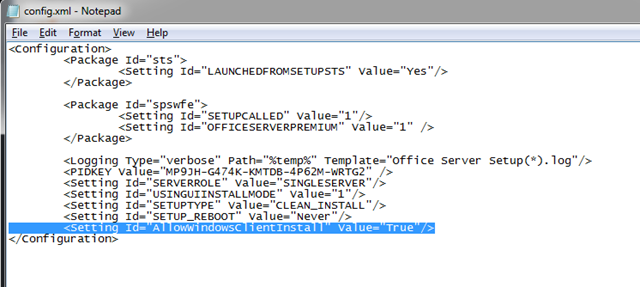
- Insert a new line in the <Configuration> section, as shown below:
<Setting ID=”AllowWindowsClientInstall” Value=”True” />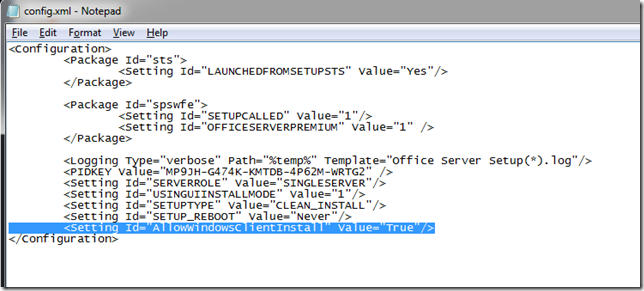
- While you have the file open, change to the key in the PIDKEY Value entry from the ‘Please enter key…’ text to your actual MSS 2010 license key.
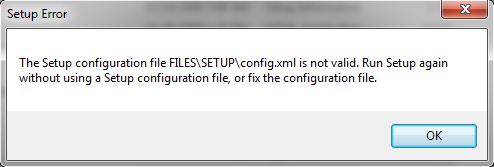
(If you don’t do this, you will likely get an error message in step 12 below that says your ‘config.xml is not valid, run setup again without using a setup configuration file, or fix the configuration file’.)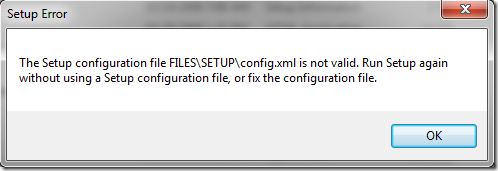
- Close and save the file.
- Now we must install the prerequisites manually. (The fancy new pre-req installer doesn’t work on a client OS.)
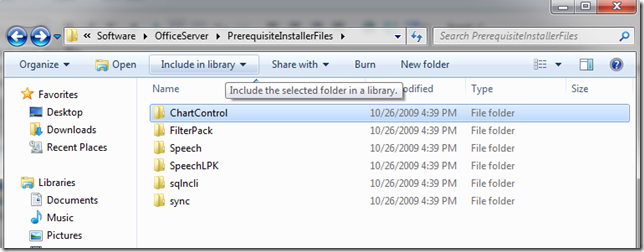
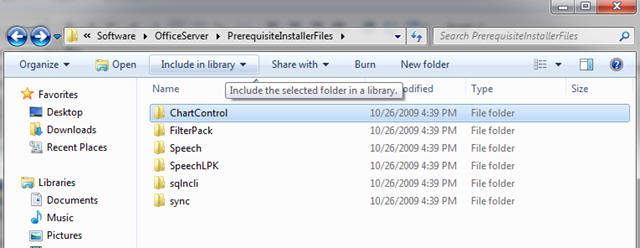
First, run all of the installer files found in the subfolders under the ExtractedDirectoryNamePrerequisiteInstallerFiles directory with the exception of the Speech and SpeechLPK folders (ChartControl (for Office Servers only), FilterPack, sqlncli, sync):
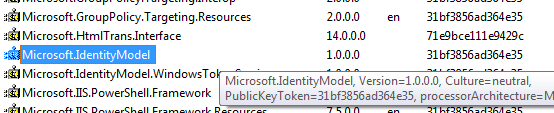
- Download and install the Microsoft Geneva Framework Runtime for x64.
(This is a tricky one. Most of the downloads you find with Google are not the correct version for the public Beta, and the one you may have used with the SharePoint 2010 Technical Preview doesn’t work either. If you don’t have the correct version, you won’t be able to complete the SharePoint 2010 Products Configuration Wizard in step 13 below. The download available at the link above worked for me with the public Beta. The key is to have the following DLL version in your c:WindowsAssembly folder: Microsoft.IdentityModel 1.0.0.0)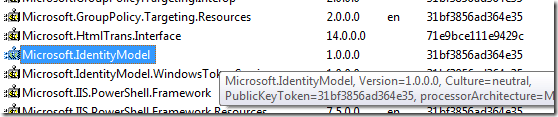
- Download and install the ADO.NET Data Services v1.5 (runtime only), or whatever is the most current version when you’re reading this.
- Download and install the SQL Server Analysis Services – ADOMD.Net, or whatever is the most current version when you’re reading this.
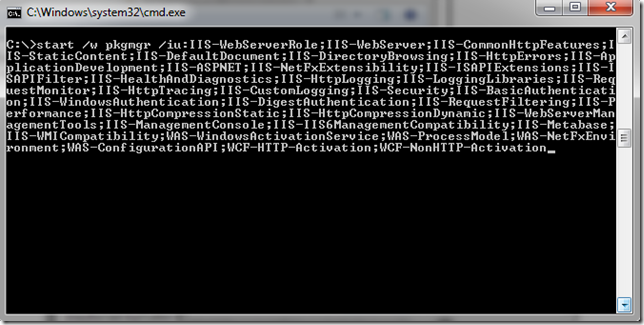
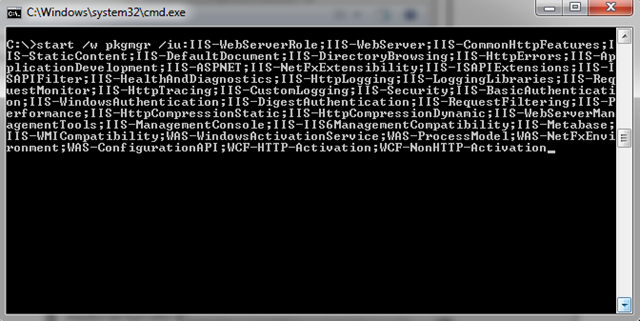
- Install the IIS pre-reqs by entering (or, lets be honest – copying and pasting) the following command without any line breaks:
start /w pkgmgr /iu:IIS-WebServerRole;IIS-WebServer;IIS-CommonHttpFeatures;
IIS-StaticContent;IIS-DefaultDocument;IIS-DirectoryBrowsing;IIS-HttpErrors;
IIS-ApplicationDevelopment;IIS-ASPNET;IIS-NetFxExtensibility;
IIS-ISAPIExtensions;IIS-ISAPIFilter;IIS-HealthAndDiagnostics;
IIS-HttpLogging;IIS-LoggingLibraries;IIS-RequestMonitor;IIS-HttpTracing;IIS-CustomLogging;
IIS-Security;IIS-BasicAuthentication;IIS-WindowsAuthentication;IIS-DigestAuthentication;
IIS-RequestFiltering;IIS-Performance;IIS-HttpCompressionStatic;IIS-HttpCompressionDynamic;
IIS-WebServerManagementTools;IIS-ManagementConsole;IIS-IIS6ManagementCompatibility;
IIS-Metabase;IIS-WMICompatibility;WAS-WindowsActivationService;WAS-ProcessModel;
WAS-NetFxEnvironment;WAS-ConfigurationAPI;WCF-HTTP-Activation;
WCF-NonHTTP-Activation
- Restart your PC.
- Run the SharePoint installer file setup.exe in the root of your ExtractedDirectoryName.
(Microsoft recommends configuring only a ‘Stand-Alone’ SharePoint instance on Windows 7, but it will allow you to choose advanced and Complete in order to specify a SQL Server if you wish.)
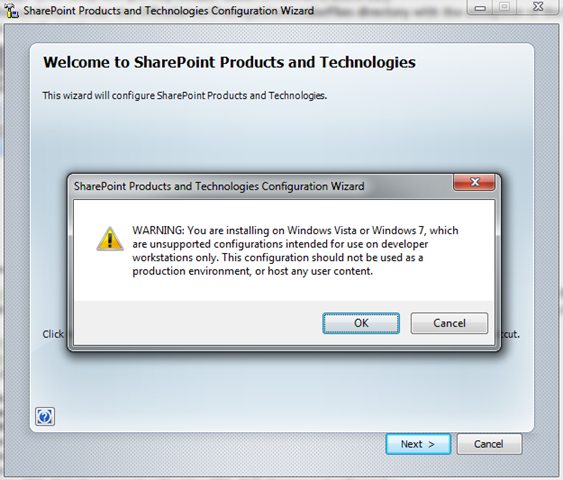
- When the installer finishes and you begin the ‘SharePoint Products and Technologies Configuration Wizard’, a popup will warn you that this use is not supported for production environments. Click OK and proceed through the wizard.
NOTE: If you need to install SharePoint in using the ‘Complete’ option to be able to use the full version of SQL Server, you will not be able to use a local user account in the config wizard. This is possible with the New-SPConfigurationDatabase PowerShell cmdlet, though. I’ll blog about using that cmdlet in a later post.